Frequently Asked Questions


Below you'll find answers to the questions we get asked the most about Athena.
To access the training video, click here.
To download and print the user guide, click here.
NOTE: It is always advisable to logout when you leave your computer or when you are not using the system for a prolonged period.
Tip: If you want to zoom in to 100%, press Ctrl+0.
Mac Users: Press ⌘ and + sign to increase the zoom level, or Press ⌘ and - sign to decrease the zoom level.
Option 2: Zoom using browser's menu options
In Chrome, click on three-dot menu (⋮) Option at the top right, next to "Zoom," choose the zoom options you want: Make everything larger: Click Zoom in + or Make everything smaller: Click Zoom out -.
NOTE: Please note that Athena has been designed to work on 100% zoom level; while increasing your zoom level is made possible by the browsers, you might experience some data overlap if you zoom(resize) too much.
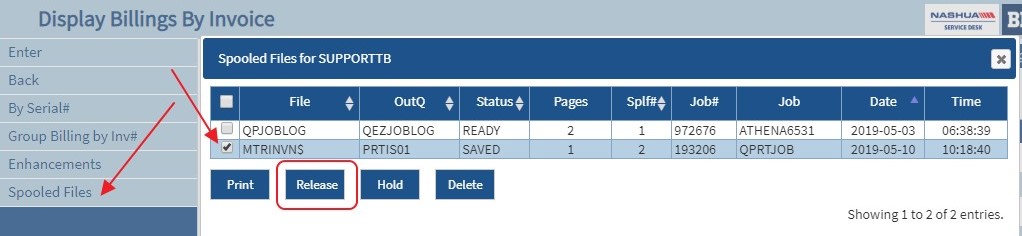
Select Spooled Files from the options on the left
Tick the spool file and select "Release"
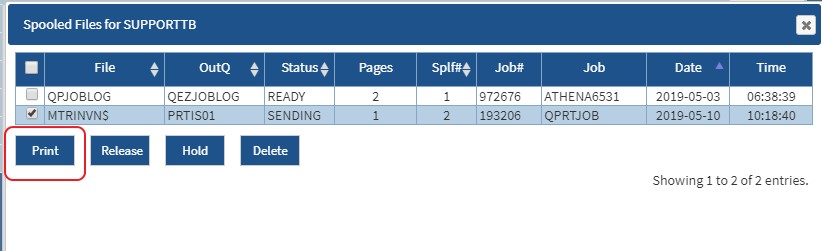
Then, Tick the spool file again and select "Print"
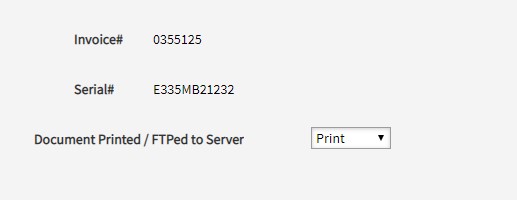
Enter your printer name and click save if you want to save your spooled file and click on the green button to print the invoice at the printer.

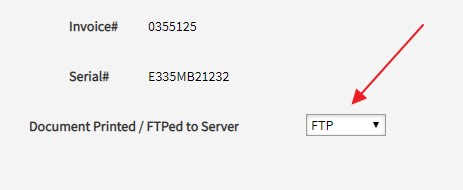
Option 2: Print to FTP
Select Spooled Files from the options on the left
Tick the spool file and select "Release"

Go to the server and open the print it will be in the correct format

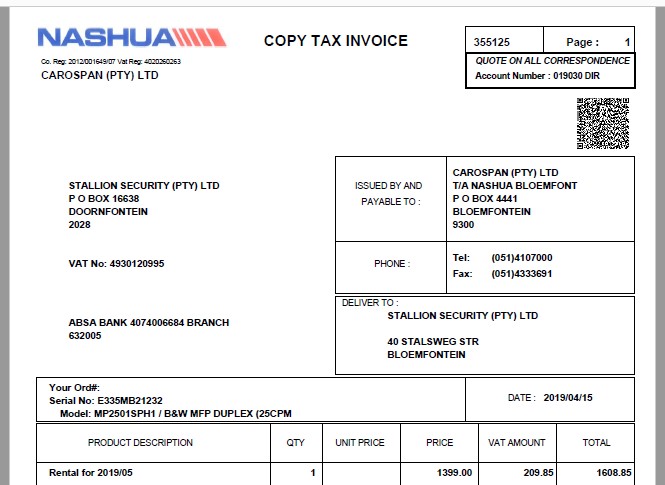
Open the PDF as shown in the example above, and that should give you a formatted PDF file.
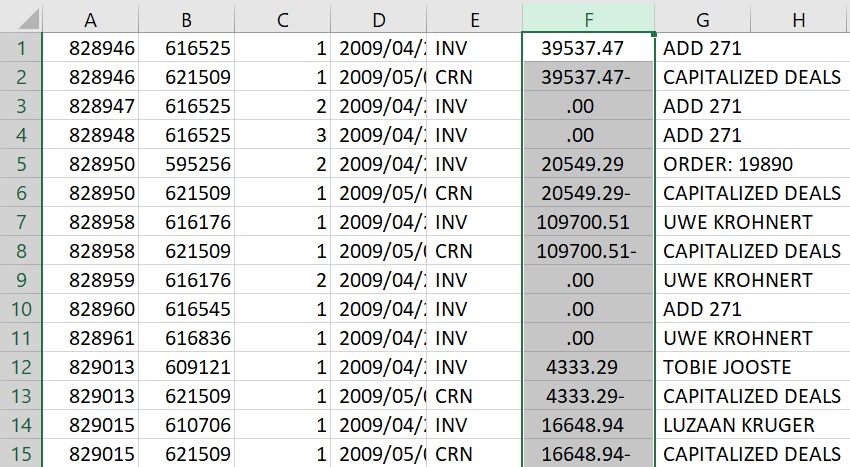
After Pasting what you have just copied from Athena to Excel, please follow steps below.
Step 1: Choose or Highlight the values column as shown below
Step 2: Go to menu option Data and click on Text to Columns

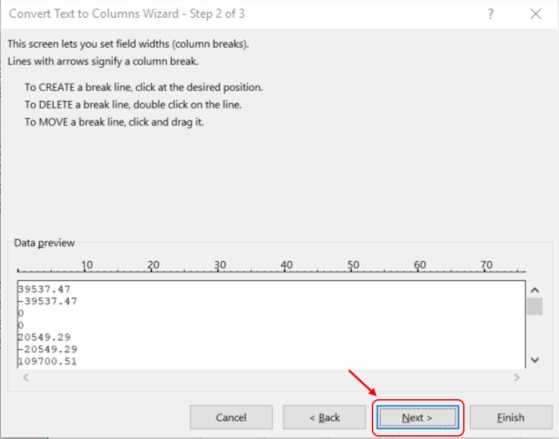
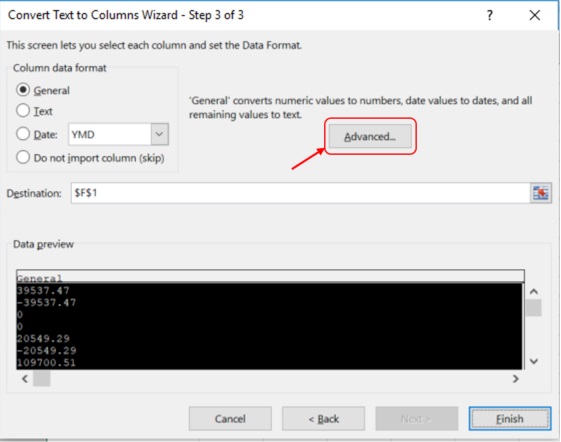
Step 4: Choose "Fixed Width" and press next, then next again on the second screen.

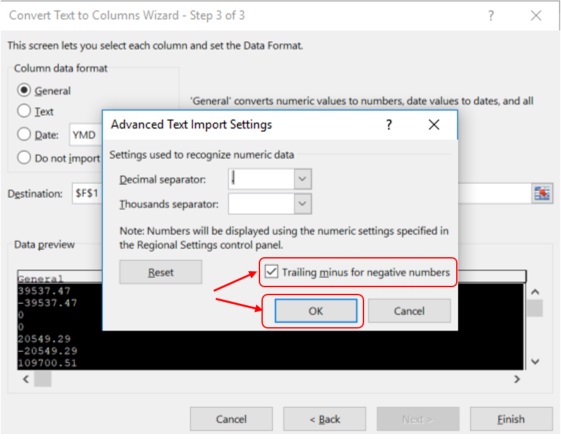
Step 5: Click on Advanced and ensure "Trailing Minus for negative numbers" is ticked, click on ok
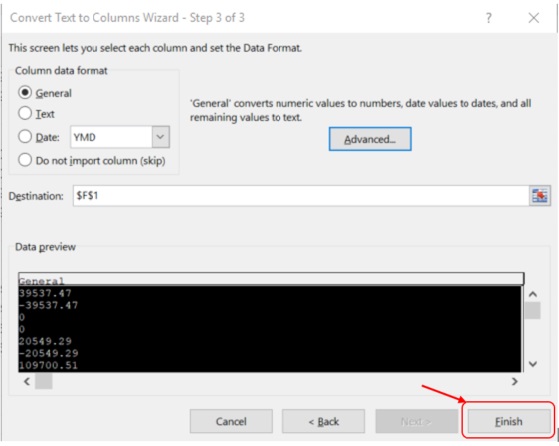
Step 6: Then click on Finish.
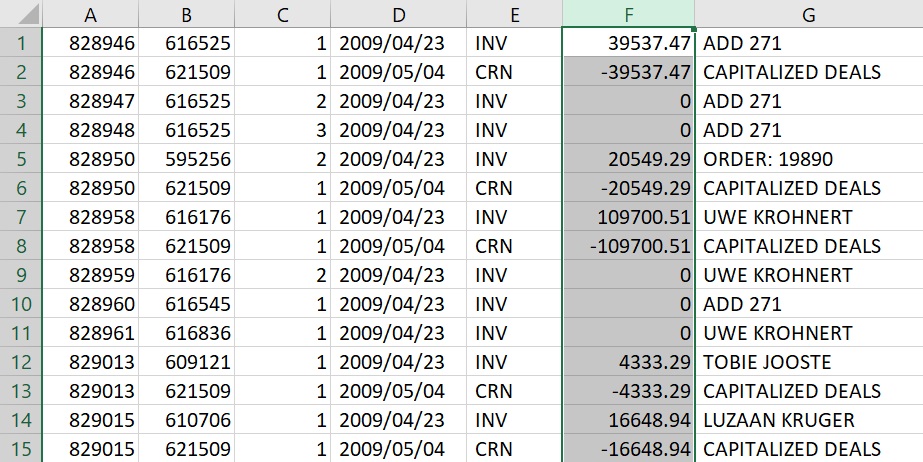
NOTE: Final output should now have minus sign in proper place (leading or prefix).
If this does not work, please check your regional settings from your control panel.
- Cookies and other site data
- Cached images and files
Option 2: Internet Explorer
- Temporary Internet files and website files
- Cookies and website data
Option 3: Firefox
Select the Privacy & Security panel.
In the Cookies and Site Data section, click on Clear Data...
Once the dialog box for clearing cache opens, please do the following:
- Uncheck/Remove the check mark in front of Cookies and Site Data.
- Tick/Check the Cache Web Content option
Close the about:preferences page. Any changes you've made will automatically be saved.
NOTE: For more information on this topic, please use the guidelines below as reference.
Step 1: Have the browser window open and navigate to the page/screen showing what it is you wish to take a screenshot off within Athena.
Step 2: Next, press the PrtScn key on your keyboard, this will automatically save your screenshot in the computer's memory.
Note: These instructions are for users that do not have other screenshoot software/programs installed on their computer.
Step 3: Click the main File option in the upper-left corner, followed by Save as.
Step 4: You may then navigate to where you saved your file and send it as an attachement to athenasupport@nashua.co.za
NOTE: There are millions of articles out there that can help you in taking a screenshoot, you are more than welcome to use any of the few guidelines below as reference.
Step 1: Click on Manage Password next to the Login Button on the login screen.
Step 2: Enter your username and registered email address for your user account then click on continue.
NOTE: An email will be sent to you with a One Time Pin(OTP).
Step 3: Enter OTP sent to you via email then click on continue.
Step 4: Close the dialog box to go back to the login screen.
Step 5: Enter your username and the new password sent to you via email.
NOTE: Once you are logged in, the system will force you to change your password where the current password is the new password that has been recently sent to you via email.
Under Saved Passwords section look for jack.nashua.co.za and click on three-dot menu (⋮) Option
next to it
On the menu option click on Remove
Option 2: Internet Explorer
Once the dialog box opens, please click on Content
Under AutoComplete, click on Settings
Click on Manage Passwords,and that will open Credential Manager from the Control Panel Items
Click on Web Credentials to see all saved web credentials
Look for jack.nashua.co.za and click on the drop down arrow next to it
Click on Remove
Option 3: Firefox
Select the Privacy & Security panel.
In the Logins and Passwords section, click on Saved Logins...
Look for jack.nashua.co.za within the Site column and click on it once to highlight it in blue. Then click the Remove button below. This will prevent passwords from being saved in the future. In older versions of Firefox, this option is in the Privacy tab instead of Security.
- Password expiration interval is 30 days.
- Characters cannot be repeated.
- Maximum password length is 10 characters.
- Minimum password length is 8 characters.
- Characters in the password cannot be in the same position as your previous password.
- Password requires a digit.
- Password cannot be repeated for the last 32 months.
- Maximum sign-on attempts allowed is 3, after 3 incorrect attempts your user profile will be disabled.
- Special characters that can be used on Athena is @,$,# and underscore _
- Passwords must start with a alphabetic character followed by any of the special characters list in point 9.
- Numeric passwords must be preceded by the letter Q.
Example password: 1234 should start as: Q1234